Hi and Happy Thursday! We are so close to Friday, which means a chance to catch my breath... We're heading out of town for the weekend just to relax as a family and I can't wait! While we're away, I'll be missing a baby shower for a friend of mine at church. She's having a boy, so I'll be sending this along for her:
This was one of those cards where I had all the pieces made, then tried a bunch of different layouts before deciding on one - I think it turned out ok :)
The stamp is from Stampin' Up's Flying Home set, colored up with my Copics. The Sentiment is from Papertrey Ink's Banner Style set.
The burlap/trim are from my stash - no 3D foam dots or sequins on this one, so I'm adding some depth with the thicker ribbons.
I'm happy with the way it all came together - Have a crafty day, friends!
About this Card:
Card Base - Papertrey Ink Classic Kraft
Patterned Paper - DCWV Watercolor 12x12 Stack
Bird Stamp - Stampin' Up Flying Home
Sentiment - Papertrey Ink Banner Style Stamp/die
Copics - E13, E15, E33, E35, BG10, BG13, BG15, YR21, YG63, YG67
Stitched Circle Dies, Ribbon, Trim
Background
Showing posts with label Twine. Show all posts
Thursday, March 8, 2018
Wednesday, February 28, 2018
With Sympathy
Good Afternoon Friends,
I've finally recovered from all of the challenge cards I made 2 weeks ago :) I've been plugging along, I just haven't been real good about posting here.
I always seem to be caught off guard when it comes to sympathy cards - I don't like to have them pre-made, because I feel like a note expressing sorrow should have a personal touch of some kind. I like to made these on an "as needed" occasion.
My friend's grandmother passed away last week, so I pulled together this card for her family:
I had a friend in a Facebook group ask if I would make her some die cuts of the Papertrey Ink Beautiful Berries: Spring set, so I stamped/cut out a few for practice. This one came out nicely, so I used it as my top accent piece and tied a little twine around the stem.
I used white cardstock for the base and Papertrey Ink patterned paper. The purple mat is cut from Papertrey Ink's Mix & Mat: Pretty Brackets Die (I LOVE these dies btw...)
I topped the mats with a simple 4" white doily (seriously got these in the baking aisle - Wilton brand) and stamped my sentiment.
I've finally recovered from all of the challenge cards I made 2 weeks ago :) I've been plugging along, I just haven't been real good about posting here.
I always seem to be caught off guard when it comes to sympathy cards - I don't like to have them pre-made, because I feel like a note expressing sorrow should have a personal touch of some kind. I like to made these on an "as needed" occasion.
My friend's grandmother passed away last week, so I pulled together this card for her family:
I had a friend in a Facebook group ask if I would make her some die cuts of the Papertrey Ink Beautiful Berries: Spring set, so I stamped/cut out a few for practice. This one came out nicely, so I used it as my top accent piece and tied a little twine around the stem.
I used white cardstock for the base and Papertrey Ink patterned paper. The purple mat is cut from Papertrey Ink's Mix & Mat: Pretty Brackets Die (I LOVE these dies btw...)
I topped the mats with a simple 4" white doily (seriously got these in the baking aisle - Wilton brand) and stamped my sentiment.
And that's it! Thanks for stopping by, and have a lovely day!
About This Card:
Base - Neenah Solar White cardstock
Patterned Paper - Papertrey Ink
Die Cut Mat - Papertrey Ink - Mix & Mat Pretty Brackets
Doily - Wilton Baking Supplies
Die Cut - Papertrey Ink Beautiful Berries: Spring
Ink - Papertrey Ink New Leaf, Green Parakeet, Royal Velvet, Amethyst Allure
Sentiment - BoBunny
Monday, August 1, 2016
Somethin's Fishy...
Hello Friends!
I was given the assignment (by my husband) of making a Thank You card. His boss took everyone from his office on a fishing trip so he needed an appropriate card for the occasion (Think manly + fishing + co-worker + thank you). Here's what I came up with for him:
So I tried a new technique here - The waves background came from an embossing folder, but I didn't want it to fill the whole background, so I fussy-cut the top third off along the wave line - I love how it came out! I can't wait to try this with other embossing folders/patterns on future cards :)
I used jewelry making jump rings to attach the fish to the line - it was a cute visual, but I wouldn't recommend doing that for a card you're going to mail.
I used some Glossy Accents on the fish to make them appear wet in spots:
Thanks for stopping by - Have an inspired day!
About this card:
Card Base - Papertrey Ink Chocolate Cardstock
Fish - Cut from Outdoor Man Cricut cartridge
Waves embossing folder - Darice
Sentiment - Papertrey Ink Fruit Fusion (Grapes)
Stash - Glossy accents, twine, jump rings, brads, Memento Ink
Tuesday, February 24, 2015
Country Chic!
Hey Everyone!
Long time no post... Life has had me hopping, which means not much scrapping :(
Luckily for me, my sister is getting married in May, and that has enabled me some crafting opportunities! Below is a picture of the invitation I made for her upcoming bridal shower:
So, we have a Country Chic theme going on for the whole wedding, and my sister is an avid horseback rider, so we went with a 'blinged-out' horseshoe as an accent piece and as an overall theme for the shower.
I love this layout for an invite - the accent piece is totally customizable, as well as the text/print work.
Simple and Chic... right up my alley!!
Have a great day!!!
Thursday, July 26, 2012
Beachy Birthday
Happy Thursday! So, as I am working to increase my stash of greeting cards at home, I figured it's summer, I need birthday cards, so let's make 'em! I was inspired by challenges this week from both Die Cuttin' Divas & Creative Cutter Room to make a beach-themed card, so here's what I came up with:
The layout was inspired by a card I found on pinterest (who doesn't love pinterest?). It's simple, summery, and best of all - we have a ton of August birthdays in our family so this one will come in handy! If you're feeling beachy this week, come play along at this week's challenges!
Entering this card in:
Die Cuttin' Diva's Challenge #75 - Summer Fun
Creative Cutter Room - Summer Fun
About this card:
Kraft Cardstock - Papertrey Ink
Navy/White Mats - Stash
Distressed Stripes Embossing Folder (Cuttlebug)
Twine - Navy/white & Gold/White - Stash
Die Cut Starfish & Seashell - Cut from the Pack Your Bags Cricut cartridge using Bazzill Bling Cardstock
Sentiment - Pink by Design Summer Vacation
The layout was inspired by a card I found on pinterest (who doesn't love pinterest?). It's simple, summery, and best of all - we have a ton of August birthdays in our family so this one will come in handy! If you're feeling beachy this week, come play along at this week's challenges!
Entering this card in:
Die Cuttin' Diva's Challenge #75 - Summer Fun
Creative Cutter Room - Summer Fun
About this card:
Kraft Cardstock - Papertrey Ink
Navy/White Mats - Stash
Distressed Stripes Embossing Folder (Cuttlebug)
Twine - Navy/white & Gold/White - Stash
Die Cut Starfish & Seashell - Cut from the Pack Your Bags Cricut cartridge using Bazzill Bling Cardstock
Sentiment - Pink by Design Summer Vacation
Saturday, July 21, 2012
I Wood Like to Thank...
I know - My puns are the worst. I get it honest... my family has 'pun-wars' over Thanksgiving dinner... Don't judge, please! Today's pun was inspired by this card:
Here's the back story - About a month ago, a strong storm knocked over a rather large tree in our back yard. Temperatures that week were averaging 90-100 degrees... it was HOT! I posted pictures on Facebook of our fallen tree, and within an hour, a friend from church commented and offered to bring his chainsaw over and help us remove it. We were so grateful for him (and his son, who also came along to help in the incredible heat), so I want to send him a thank you card. I absolutely COULD NOT pass up the opportunity to use my wood grain embossing folder (The Paper Studio). I knew that bugger would come in handy some day :) While I'll be sending him this card tomorrow, I hope I also have the opportunity to pay it forward. Being on the receiving end of such a random act of kindness is a feeling like no other, and I hope to pass it along to someone soon!
Oh, and I just got the 'perfectly penned' sentiment stamp set from Stampin' Up, and I love it (Thank you, Kathy) in case you were wondering where the stamp came from. Have a wonderful weekend everyone!
About this card:
Kraft/Brown Cardstock - Papertrey Ink/Stash
Hemp cord
Sentiment - Perfectly Penned - Stampin' Up (Stamped in Stazon Timber Brown)
Embossing Folder - Wood Grain - The Paper Studio
Distressing - Vintage Photo - Ranger
Metal Pearls - Making Memories Stash
Monday, March 5, 2012
Non-Card Fun
Hi Everyone... I just can't seem to catch up and do things I want to these days... such is life :)
I made the following for a friend who I am swapping with on another site:
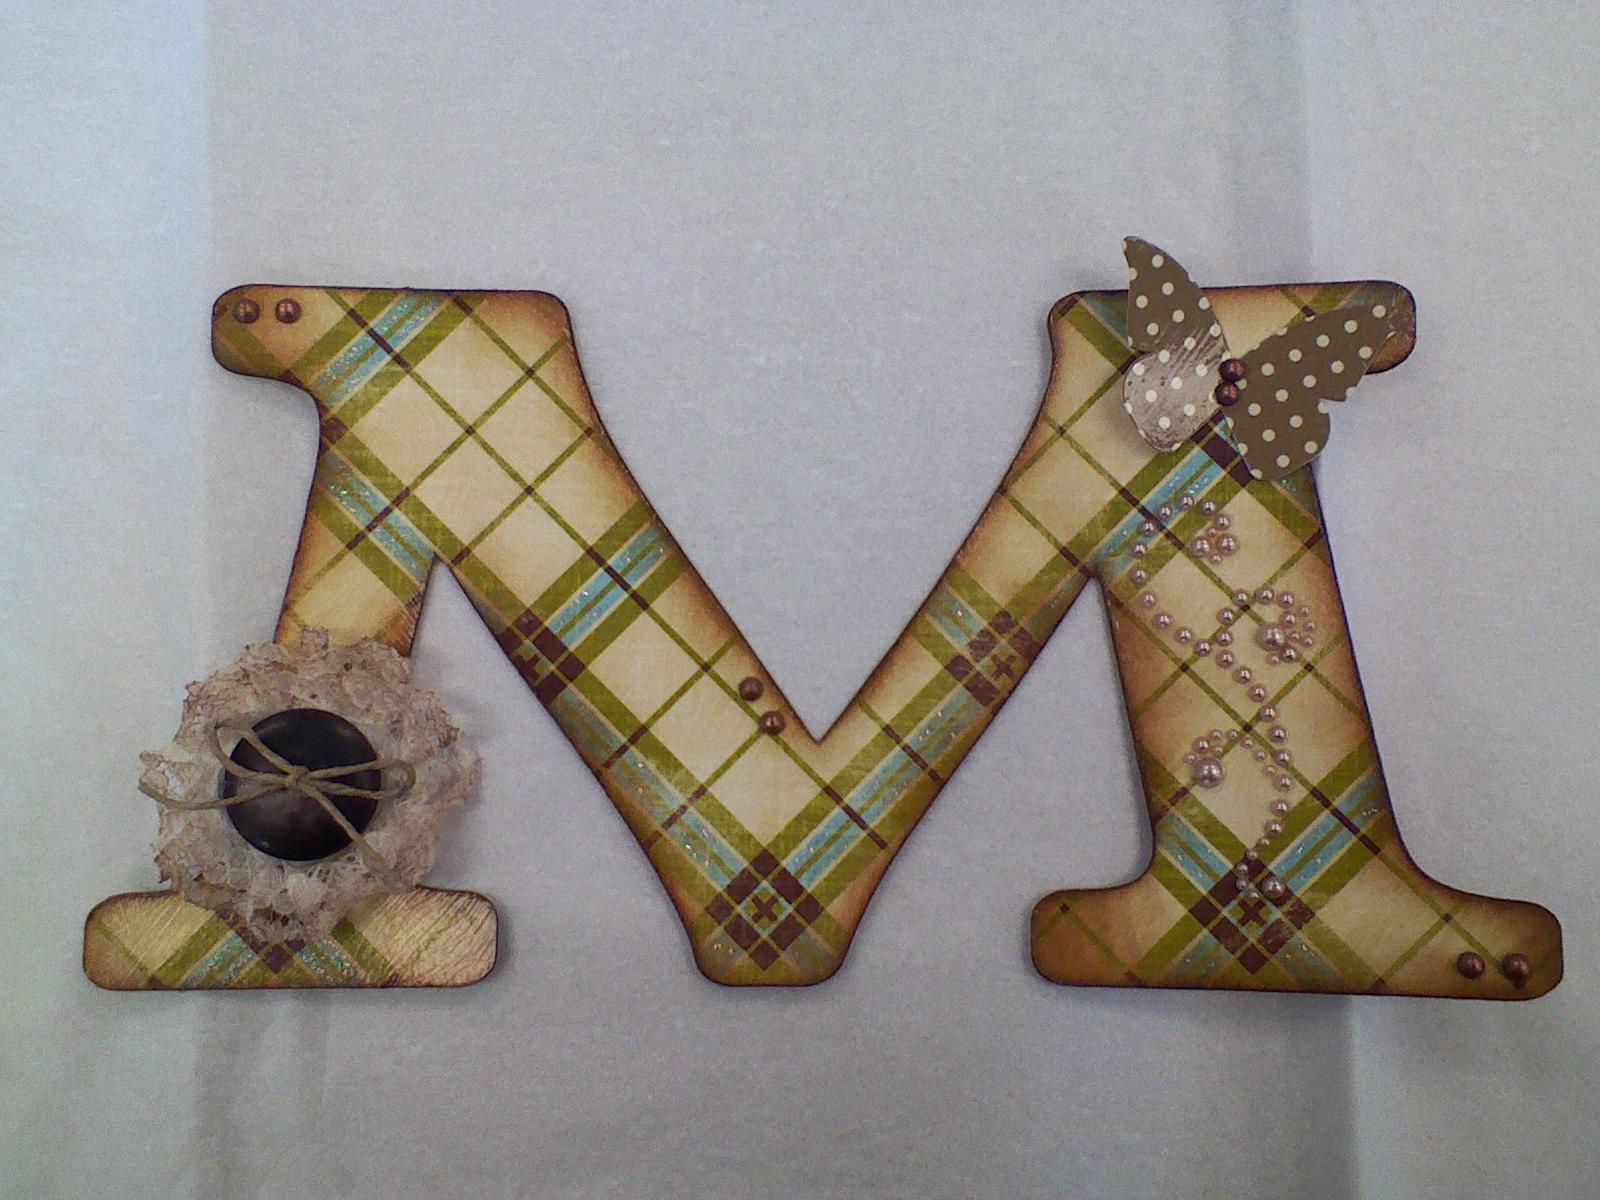
This was my first attempt at altering something totally from scratch. I started with a cereal box, and used that as my base. I cut the M from the cereal box, using the Rolly Polly font on the Plantin Schoolbook cartridge. Then I cut the same M out of some Fancy Pants cardstock I got in a grab bag, and glued them together. (Lesson learned - - - Next time I will flip one of the images on my gypsy, so I can cover the printed side on the cereal box. This M says Cheerios on the back of it!)
I distressed the edges with Vintage Photo Distress Ink, and put 2 coats of ModPodge on it. I used the matte ModPodge for the base coat, then used the glossy ModPodge on top of that - I like the effect it gave the finish. I also ModPodged the butterfly and used a recollections pearl flourish to embellish the right side. The left side button was fun to make! I took some lace and hot-glued folds into it. then I formed a circle out of it (think rosette folding), and hot glued it onto the back of the brown button. I distressed the lace with Vintage Photo Distress ink, and tied some hemp cord in a bow through the button holes. I had to use my ATG gun/tape to get it to stick to the 'glossy' surface - it's not budging, I guarantee it! I placed a couple of vintage pearls around a few of the edges, and there you have it!
I hope my partner likes it! The finished size is 6"tall by 10" wide. I can't wait to make more of these, especially for some kids I know, to help decorate their bedrooms.
Try something new today - I did, and I loved it - Have a great, crafty day!
Wednesday, January 18, 2012
Getting Squirrel-y
Hello again :)
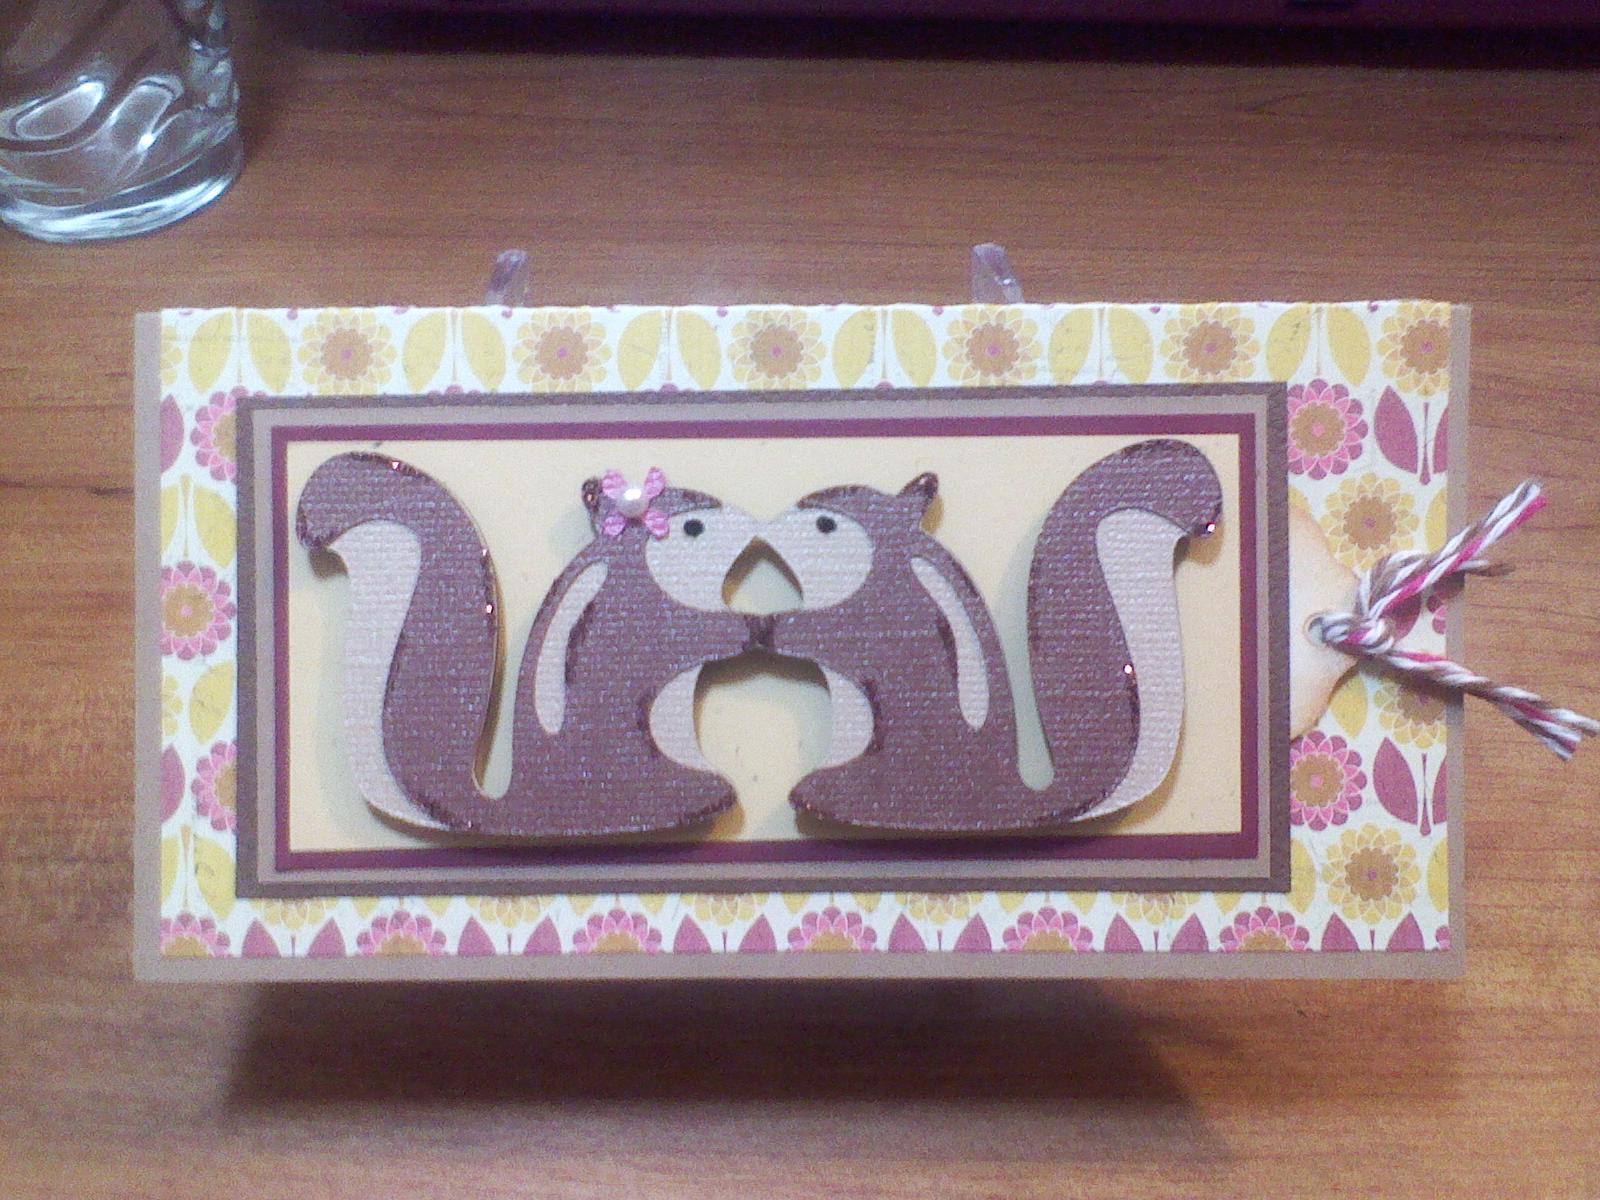
I am REALLY excited to share this card with you, because I just love how it turned out! I made this card to enter into the challenge going on right now over at Die Cuttin Divas. The challenge is to make something with a squirrel on it (random fact - Squirrel Appreciation Day is 1/21). Here's what I came up with:
The tag hiding behind the mat looks like this:
I had never heard of squirrel appreciation day before. Honestly, I really don't like squirrels - they eat all of the good food I put out in my bird feeders. However, today I do need to be grateful to them for inspiring this cute card. If you're feeling squirrel-y, hop over to Die Cuttin Divas and try their challenge this week - It'll be fun!
About this card:
Kraft Base 6"x6" (folded in half)
Patterned Paper - Sassafrass Lass - Count Me In
Die Cut Mats - Stash
Cricut Cut - Give a Hoot cut at 1.75"
Stickles - Cinnamon, Black Diamond
Pearl & Twine - Stash
Sentiment - My Pink Stamper Punny-licious
Distress Ink - Tea Dye
Friday, August 19, 2011
Challenge Time!
Hi Everyone! I have some good news :) I was accepted into the Focus Group for Crop Chocolate, the one I told you about in my previous post! I am very excited to be a part of this group! We were already given a challenge to participate in, so I wanted to share my entry with you, and wanted to show you how YOU can play too! We were given this photo:
We were asked to design a project using this photo collage for inspiration, that contained 75% of materials purchased from Crop Chocolate (see sidebar). Here's what I came up with:
As you can see, I focused on layout and basic elements for this card I entered. Here's what I used:
All of the cardstock came from a Crop Chocolate (CC) grab bag (with the exception of the white base & the white tag I stamped/colored). Here's what I used:
1.) Upper left corner - Bo Bunny a gift of Love/Coral Dot mounted on Basic Grey Indian Summer plum wine. I used Gina K luxury white for the tag/stamp base - the stamps (inkadinkado & KI & Co.) and copics I used to color were mine. I cut the tag from Spellbinders Labels 4.
2.) Upper right corner - American Crafts City Park/Hyde Park mounted on Echo Park Be Mine/Lipgloss Stone. I ran the top layer through my cuttlebug using my swiss dots folder. I mounted on them a Sassafras Paper Whimsy/Flower Child and put glossy accents on all of the petals & stem. The button in the center is a Making Memories paperie button from the poolside collection. - All CC :)
3.) Lower left corner American Crafts City Park/Lakeside park mounted on the reverse side of itself. The twine was from my stash, and the brad is from Making Memories Paper Reverie Noir collection.
4.) Lower right corner - American Crafts City Park Fairmont Gardens mounted on the reverse side of itself. I ran the top layer through my cuttlebug using the d'vine swirls folder, then mounted Making Memories Metal Butterflies to it. - All CC again :)
NOW - Here's how you can play along... My friend Paula at Scrap Addict's Attic is using the same photo collage as inspiration for a challenge on her blog - please click through to her blog and play along... you'll be amazed what you come up with!
Have a great weekend everyone!
We were asked to design a project using this photo collage for inspiration, that contained 75% of materials purchased from Crop Chocolate (see sidebar). Here's what I came up with:
As you can see, I focused on layout and basic elements for this card I entered. Here's what I used:
All of the cardstock came from a Crop Chocolate (CC) grab bag (with the exception of the white base & the white tag I stamped/colored). Here's what I used:
1.) Upper left corner - Bo Bunny a gift of Love/Coral Dot mounted on Basic Grey Indian Summer plum wine. I used Gina K luxury white for the tag/stamp base - the stamps (inkadinkado & KI & Co.) and copics I used to color were mine. I cut the tag from Spellbinders Labels 4.
2.) Upper right corner - American Crafts City Park/Hyde Park mounted on Echo Park Be Mine/Lipgloss Stone. I ran the top layer through my cuttlebug using my swiss dots folder. I mounted on them a Sassafras Paper Whimsy/Flower Child and put glossy accents on all of the petals & stem. The button in the center is a Making Memories paperie button from the poolside collection. - All CC :)
3.) Lower left corner American Crafts City Park/Lakeside park mounted on the reverse side of itself. The twine was from my stash, and the brad is from Making Memories Paper Reverie Noir collection.
4.) Lower right corner - American Crafts City Park Fairmont Gardens mounted on the reverse side of itself. I ran the top layer through my cuttlebug using the d'vine swirls folder, then mounted Making Memories Metal Butterflies to it. - All CC again :)
NOW - Here's how you can play along... My friend Paula at Scrap Addict's Attic is using the same photo collage as inspiration for a challenge on her blog - please click through to her blog and play along... you'll be amazed what you come up with!
Have a great weekend everyone!
Wednesday, August 3, 2011
Focus Group Entry
Hello everyone! This week I decided to enter to become a member of a focus group for Crop Chocolate (CC). CC is a website that offers 1 deal at a time, multiple times throughout the day. What makes them extra special, is that you can hold numerous items in your cart and have them shipped all together to save on shipping. I stumbled upon them 2 months ago, and it has become my favorite site for deals - click the link in my sidebar to check them out - tell them 'Crazy4Cocoa' sent you (yep... that's me)!
Back to the topic here - CC is forming a focus group and asked people to enter by creating a project using 4 elements from crop chocolate. Here's my entry:
The 4 elements I used from CC were the patterned paper (Echo Park Splash), the whale's eye is a Basic Grey brad from Oliver, the aqua trim is from the Fine and Dandy line and the Blue button is from Making Memories. I'll let you know if I make the cut! If I don't, there will be a new focus group forming in 6 months, so there's always next time :)
Additionally about this card:
Navy Cardstock Base - Papertrey Ink Enchanted Evening
Whale - Cricut Cut from Splish Splash Lite Cartridge cut at 3" using Bazzill Bling Cardstock
Sentiment - My Pink Stamper Punny-licious Set
Stickles - Turquoise & Waterfall
Twine & White CS - Stash
Thanks for looking!
Back to the topic here - CC is forming a focus group and asked people to enter by creating a project using 4 elements from crop chocolate. Here's my entry:
The 4 elements I used from CC were the patterned paper (Echo Park Splash), the whale's eye is a Basic Grey brad from Oliver, the aqua trim is from the Fine and Dandy line and the Blue button is from Making Memories. I'll let you know if I make the cut! If I don't, there will be a new focus group forming in 6 months, so there's always next time :)
Additionally about this card:
Navy Cardstock Base - Papertrey Ink Enchanted Evening
Whale - Cricut Cut from Splish Splash Lite Cartridge cut at 3" using Bazzill Bling Cardstock
Sentiment - My Pink Stamper Punny-licious Set
Stickles - Turquoise & Waterfall
Twine & White CS - Stash
Thanks for looking!
Thursday, July 21, 2011
Positive Reinforcement
So, my Mom watched my 2 year old daughter for me today while I was at work. She also watched my 4 year old niece - and they both got a VERY GOOD report card from Grandma for sharing and playing so nicely together all day! My niece, Danielle, is really into Littlest Pet Shop and Zoobles, and I guess that's what they played with all day. I want Danielle to know that my Daughter, Jocelyn, really appreciated her sharing her toys today, so I threw together this quick card for her:
Danielle will be so excited to get mail from her cousin! I hope it encourages her to continue to share her toys in the future as well. Can't hurt, right?
About this card:
Patterned Paper: My Minds Eye - Laundry Line
Elephant - Cricut cut from Create a Critter cut at 2" on Bazzill Bling
Ribbon, Twine & Bling - Stash
Tag - Hand cut from Bazzill Bling
Stickles - Pink
Sentiment - Pink by Design Jungle Fever clear stamp set
Rounded corners using Corner Chomper 1/4"
Danielle will be so excited to get mail from her cousin! I hope it encourages her to continue to share her toys in the future as well. Can't hurt, right?
About this card:
Patterned Paper: My Minds Eye - Laundry Line
Elephant - Cricut cut from Create a Critter cut at 2" on Bazzill Bling
Ribbon, Twine & Bling - Stash
Tag - Hand cut from Bazzill Bling
Stickles - Pink
Sentiment - Pink by Design Jungle Fever clear stamp set
Rounded corners using Corner Chomper 1/4"
Sunday, July 3, 2011
Replenishing My Stash
Hi Everyone - Happy 4th of July weekend! Isn't it great that the 4th fell on a Monday this year? I just LOVE 3-day weekends! My "extra cards on hand" stash got hit pretty hard last month, so I am in the process of replenishing. I've been VERY anxious to try out my new Florals Embellished Cricut cartridge, and I LOVE it! I really enjoy making 4x4 cards - they're small enough to make quickly, they're big enough to get the "wow" factor, and you can make an envelope for them out of a regular sized piece of paper. Here's the one I made last night:
The card uses 3 of my favorite papers, which I'll specify below. The cut is mounted on the card using Pop-Dots, to give it some dimension. This cut is 7 layers thick, so it may not have needed it, but I wanted it to have that extra pop! I left the inside blank so that they can be used for whatever occasion comes up at the last minute - all I need to do is stamp a quick sentiment inside, and I'm ready to go:
I love how summery this card looks - guess that means that I need to use it soon! Happy Independence Day!
About this card:
Base Cardstock - Papertrey Ink (8x4)
Cricut Cut - Florals Embellished using Bazzill Bling cut at 2.5"
Patterned Paper - My Minds Eye "Fine & Dandy" Line
White Cardstock, 3D Dots & Twine - Stash
The card uses 3 of my favorite papers, which I'll specify below. The cut is mounted on the card using Pop-Dots, to give it some dimension. This cut is 7 layers thick, so it may not have needed it, but I wanted it to have that extra pop! I left the inside blank so that they can be used for whatever occasion comes up at the last minute - all I need to do is stamp a quick sentiment inside, and I'm ready to go:
I love how summery this card looks - guess that means that I need to use it soon! Happy Independence Day!
About this card:
Base Cardstock - Papertrey Ink (8x4)
Cricut Cut - Florals Embellished using Bazzill Bling cut at 2.5"
Patterned Paper - My Minds Eye "Fine & Dandy" Line
White Cardstock, 3D Dots & Twine - Stash
Friday, June 24, 2011
Welcome to the June Bug Blog Jump!
If you started somewhere in the middle of our lineup, then you arrived here from Jana at Simply My Crafts - I can't wait to try her idea with some of the things I have laying around :)
Our group started out back in February on the Cricut message boards doing a 'Secret Leprechaun' swap. We had so much fun, we didn't want it to end once St. Patrick's Day was over. We quickly threw names into a hat again, and produced the Bashful Bunny swap and once that swap ended, we voted for yet a third round - the Jumpin June Bug swap. We don't only shop for each other, but we also aim to inspire and support each other as friends. This is really a talented group of Ladies, and we have all become so close! This is the 2nd Blog Hop our group has hosted to showcase our talents and hopefully we will inspire each person who hops through with us this weekend.
Here's what I'd like to share with you today:
COIN ENVELOPE SUMMER MINI ALBUM
I knew almost instantly that I wanted to use the Citrus Stack from DCWV - It has the best summer colors in it! I considered buying the envelopes and embellishing them, but opted to cut my own out of the Citrus cardstock, using the Tags, Bags, Boxes and More Cricut Cartridge for both the envelopes and the tags.
I cut 5 envelopes out of 5 different paper patterns. These 5 envelopes became the inside envelopes. I trimmed the upper flap off, and used my ATG gun to tape them together, one on top of the other, back-to-front style. I ran a strip of tape down the bottom half of the center of each envelope, and also across the bottom, so that the tops would open like an accordion.
Once I had the inside of my album assembled, I used my Gypsy to design & cut a slightly longer cover envelope, one that could wrap around the 5 inside ones. I sewed a button on the closing side to anchor any string that would be used to close it, if desired. Finally, I used my ATG to adhere the longer cover around the 5 envelopes, and the album is complete!
She was a Flower Girl in a wedding...
She played in the ocean...
She rode the Merry-Go-Round...
She jumped through the sprinkler...
She rode the Clydesdales at Busch Gardens, VA...
Supplies Used:
DCWV Citrus Stack
Distress Inks - Broken China, Scattered Straw
Bakers Twine
Stickles
Ribbon, buttons, flowers, stickers, flourishes - stash
CANDY... CANDY... WHO WANTS CANDY???
Since we're in Summer Crafting mode, I thought I'd offer some stamps that could be used to help that cause:
This is the Coastal set of 13 clear acrylic stamps from Inkadinkado - These images are very versatile, and can be used on almost any summer project!
I included 2 pictures of my daughter riding rides at amusement parks in my album - she LOVES the rides! I actually had 2 other pictures of her on rides that didn't make the cut for this project! To qualify to win these stamps, please:
1.) Become a follower if you are not already
2.) Leave me a comment on this post and tell me - Do you like amusement parks? If so, what is your favorite ride?
I will draw a winner on Monday, so please check back to see if you are a winner!
Ok... enough time here... let's get you on your way. It's time for you to visit Rhonda at Heart2hand's Highlights - Wait till you see what she has to share with you - she is SO talented! Here's our lineup for the weekend - Please share this hop with your friends and invite them to jump along with us:
My Little Corner <-- You are here :)
Labels:
Cricut,
Distress Ink,
Fun Folds,
Stickles,
Twine
Sunday, June 19, 2011
Happy Father's Day!
Yeah - A post without a robot!
In already posted my hubby's Father's Day card from me, but I made this card to give to him from our Daughter. I'm excited because, while it's VERY simple, it's my first easel card. Here's the outside of the card:
And when you open it and stand it up, it looks like this:
Hubby recently got a new job, and needs some 'personal touches' for his desk, so with that in mind, I made this for him.
HAPPY FATHER'S DAY TO ALL THE DADS TODAY!
About this card:
Card Base & Layers: Papertrey Ink
Nestabilities: Labels 1
Star Brad & Blue Button - Making Memories
Twine, Silver Brads, Blue Ink & Silver Stickles - Stash
Stamp Sentiments - Studio G
In already posted my hubby's Father's Day card from me, but I made this card to give to him from our Daughter. I'm excited because, while it's VERY simple, it's my first easel card. Here's the outside of the card:
And when you open it and stand it up, it looks like this:
Hubby recently got a new job, and needs some 'personal touches' for his desk, so with that in mind, I made this for him.
HAPPY FATHER'S DAY TO ALL THE DADS TODAY!
About this card:
Card Base & Layers: Papertrey Ink
Nestabilities: Labels 1
Star Brad & Blue Button - Making Memories
Twine, Silver Brads, Blue Ink & Silver Stickles - Stash
Stamp Sentiments - Studio G
Friday, April 22, 2011
Preparing for Birthday Week
Happy Friday Everyone!
I hope everyone has a fun weekend planned, and that The Easter Bunny brings everyone their favorite goodies! This week is big for me - My Hubby's birthday is Thursday and my Daughter turns 2 on Friday. This being a Holiday weekend has forced me to start their goodies a little early, so that's exactly what I did last night. Here's the card I made for my Husband's upcoming birthday.
He thinks Cricut cuts are so neat, so while I needed to keep this masculine, I also was 'allowed' to put some cute into it since it is for him. Right now, I am totally loving the look of Baker's Twine on cards - My twine order hasn't arrived yet, so I found some Sugar 'N Spice crocheting yarn at Michael's that looks like the twine, and used that for the bow and background on this card. The inside of the card reads Hap-Bee Birthday, the saying that came with this cut from Birthday Bash.
Thanks for looking - Have a Blessed Easter Weekend Everyone!
About this card:
Card Base - StudioG
Scalloped Circle - Spellbinders Nesties/Papertrey Inc. Patterned Paper Distressed with Walnut Stain Distress Ink
Cricut Cut - Bee from Birthday Bash cut at 4" on Bazzill Bling cardstock
Sugar 'N Spice Crocheting Yarn
Stickles - Black Diamond, Lime Green, Waterfall & Yellow
I hope everyone has a fun weekend planned, and that The Easter Bunny brings everyone their favorite goodies! This week is big for me - My Hubby's birthday is Thursday and my Daughter turns 2 on Friday. This being a Holiday weekend has forced me to start their goodies a little early, so that's exactly what I did last night. Here's the card I made for my Husband's upcoming birthday.
He thinks Cricut cuts are so neat, so while I needed to keep this masculine, I also was 'allowed' to put some cute into it since it is for him. Right now, I am totally loving the look of Baker's Twine on cards - My twine order hasn't arrived yet, so I found some Sugar 'N Spice crocheting yarn at Michael's that looks like the twine, and used that for the bow and background on this card. The inside of the card reads Hap-Bee Birthday, the saying that came with this cut from Birthday Bash.
Thanks for looking - Have a Blessed Easter Weekend Everyone!
About this card:
Card Base - StudioG
Scalloped Circle - Spellbinders Nesties/Papertrey Inc. Patterned Paper Distressed with Walnut Stain Distress Ink
Cricut Cut - Bee from Birthday Bash cut at 4" on Bazzill Bling cardstock
Sugar 'N Spice Crocheting Yarn
Stickles - Black Diamond, Lime Green, Waterfall & Yellow
Labels:
Card,
Cricut,
Distress Ink,
Nestabilities,
Stickles,
Twine
Subscribe to:
Posts (Atom)