Background

Monday, December 30, 2013

Happy 2014!

Hello Fellow Crafters!

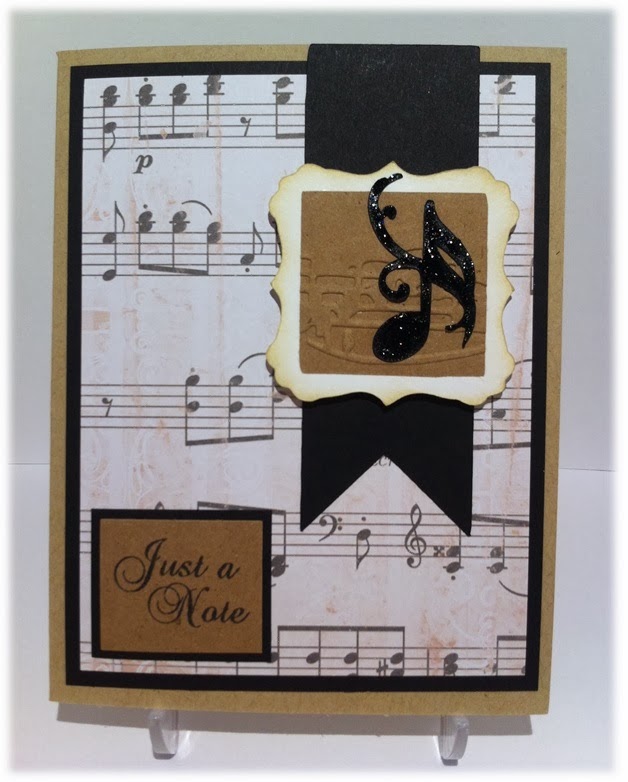
Hoping this post finds you recovering from the Christmas rush, and that you were blessed with friends and family abound!  This week's challenge over at Exploring Cricut is to create something celebrating the New year.  Next on my holiday agenda is New Year's Eve - we'll be spending it with my Sister-In-Law and her family,  To show my appreciation for her hospitality, I'll be taking along a bottle of wine and this card:


I just got the "Small Talk Frames & Tags" Cricut cartridge for Christmas, so I just had to play with it here.  I used it to make the 'Polaroid' frame, and I used "Cricut Classic Font" for the 2014.

Please join our challenge at Exploring Cricut, and share your New Year's creations with us!

Hoping everyone has a Happy & Safe New Year - I'll be back with a post on New Year's Day, so please make a point to stop back then!

About this card:
Patterned Cardstock Base - DCWV Dots, Stripes & Plaids
Cricut Cartridges - Small Talk Frames & Tags and Cricut Classic Font
Fireworks - Darice Embossing Folder, daubed in Memento Brilliance inks
Stickles, Blue/Green Mat from Stash

Wednesday, December 18, 2013

Creative Cards to the Rescue!

Hey All!

Need a break from Christmas crafting?  I do... And I have a good reason... Here's the story...

My Mom's birthday is December 28th.  Since we were little, my Mom has always made a big deal about how she doesn't like how close her Birthday is to Christmas - she would love to be able to fully celebrate each occasion separately without lumping everything together.  We won't talk about the year I got lazy and wrapped her birthday gift in Christmas paper... My Mom is NOT ungrateful, I was just being a stinky teenager.  ANYWAY... onto today's project! That all said, I need to have cards on hand that are somewhat universal and show no signs of Christmas.  Last weekend I went on a scrap retreat with some girls and caught up on making cards just for such occasions - Here are a few:


Thank goodness for Cricut's Creative Cards cartridge!  All 3 of these are from that cartridge - it has done all of the design and layout work for you, and you get to have TONS of fun choosing fun papers, color schemes and sentiments to go along with them.  Here are some close ups of each card:


I will always turn to this cartridge for quick cards to impress - they come together very easily and you can do so much with them to customize them.  Hopefully I've given you a reason today to dig out this cartridge and play with it.  Your mom will love them!!!

Check back daily over at Exploring Cricut for inspiration while you play with paper :)

About these Cards:
Cricut Cartridge "Creative Cards"
Card Bases - Papertrey Ink & Bazzill
Patterned Paper - Echo Park & DCWV Blue Citrus
Sentiments - Pink by Design & PTI
Embossing Folder - Stampin' Up
Stickles, Liquid Pearls, Memento Ink, Gems, 3D Foam Dots

Monday, December 16, 2013

Christmas Decor

Hello and Merry Christmas!

This week's challenge over at Exploring Cricut is "It's Beginning to Look Like Christmas" - That's right - it's time to get the house decorated if you haven't already done so!  In that spirit, I'm sharing a decorative piece with you, as opposed to the usual cards I always share:

I am really happy with how this turned out!  I took a 5" x 7" espresso colored frame and mounted some burlap fabric on the back piece (and popped it out with an extra 4.5"x  6.5" piece if cardboard.  Both of these cuts are from Anna Griffin's Winter Wonderland cartridge.  The bell is cut at 5" height and the swag is cut at 6" width.  Here is another picture with different lighting:


In this picture, you can see that I mounted the bell with 3D foam dots for some dimension.  I also used stickles and pearls to accentuate the cuts.

I wish I had bought more of these frames, because there are so many wonderful cuts on this cartridge, that I could see myself making a trio of these, in all coordinating colors just different cuts, to hang close to each other.  Maybe I'll venture out on this snowy day to do just that!

Please share your Christmas projects with us!  Go to Exploring Cricut and enter your creations - we all want to see what you've been up to this season!

About this Project:
5x7 Espresso Frame from AC Moore
Burlap Fabric
2 Cuts from Anna Griffin's Winter Wonderland Cartridge
Bazzill Bling Card Stock
Stickles, Pearls, Cream Pearl Pen, Ribbon, 3D Foam Dots

Wednesday, December 4, 2013

Wednesday Whimsy

Oh the time has come...

No, not Christmas... The time has come where my daughter is old enough to be invited to EVERY KID'S BIRTHDAY PARTY IMAGINABLE!

Not a problem!  It's an Ariel themed party?  I've got you covered!

This was my first time using the Disney "Dreams Come True" cartridge - I am impressed with how intricate the layers are, and how real the images look once assembled.  I'm sure since my daughter is around 'that age' I'll be called upon to cut more from this cartridge... maybe even for the next party... which might I add is only 2 weeks away :)

I posted this card as part of our daily inspiration over at Exploring Cricut - Come on over and join our Christmas Card challenge if you haven't already done so!

Have a great day everyone!

About this Card:
Studio G White Circle Card Base
Lt. Blue Mat - Embossed with D'vine Swirls Cuttlebug Folder
Ariel - Cut from "Dreams Come True" Disney Cricut Cartridge
     Ariel's tail is embossed with Stampin' Up's Fancy Fan Embossing Folder
Seashell - Cut from "Dreams Come True" also
Sentiment - from Tim Holtz clear Birthday collection
3D Foam dots, Stickles

Monday, December 2, 2013

Christmas Card Challenge

Happy Monday!  Today starts a new challenge over at Exploring Cricut - Christmas Cards!  If you haven't started yours yet, head on over to our Design Team's page and check out what we have to inspire you!

The card I made for this challenge goes against the "red and green/trees and santas" style that I typically send out.  I had a baby boy this year in March, and I really feel a strong personal connection to what Christmas is really about this year because of that.  So here is what I came up with:
I cut the manger/baby out of Bazzill Bling cardstock using the "A Quilted Christmas" Cricut cartridge.  The patterned paper sky is a sheet of Echo Park's "Wintertime" by Bella Road, and the hills are kraft paper torn and distressed along the edges.  I used 3D Foam Dots to pop out the manger, and created the star using my iRock for the first time ever!

Wishing you many blessings this Holiday season, and much inspiration for getting your cards done.  Don't forget to link up your Christmas Cards over at Exploring Cricut!

About this Card:
Kraft Base
Pattern Paper - Echo Park "Wintertime" by Bella Road
Die Cut - "A Quilted Christmas" in Bazzill Bling
Sentiment - My Pink Stamper "Christmas Wishes" in Memento "Rich Cocoa" Ink
"Scattered Straw" Distress Stickles, 3D Foam Dots, Hot-Fix Gems/iRock, Tea Dye Distress Ink

Wednesday, November 20, 2013

Wonderful Wednesday!

Today, my project for the Exploring Cricut blog is a composition notebook altered into a Prayer Journal:
I picked up a bunch of these composition notebooks when they were on sale during Back-to-School season, and this is the first one I've had the time to play with.  I covered the front and back covers with kraft paper, glued a strip of thicker cardstock (Bazzill Bling/eyelet punch) down the spine, and decorated the cover.  My church has a Secret Sister program, and I am going to give this to my Secret Sister as a gift this coming Sunday.

I used the New Testament Cricut Cartridge for the Bible and Dove cuts, and I used the font from Winter Woodland and welded the shadow on my Gypsy.  I used Glossy Accents on the Bible cover to make it look more 'book-ish'.  <<-- I love making up words :)

Too bad I can't sign my name to it... It is a secret, after all!

Have a crafty day!

About this project:
1 Composition Notebook from Walmart
Kraft Paper from Joann's
Bible - New Testament Cricut Cartridge + Glossy Accents
Dove - New Testament Cricut Cartridge + Pearl Pen eye
Prayer Journal - Winter Woodland font, welded on a Gypsy
Glitter Bling Frame - Making Memories
Pearl Flourishes - Prima

Monday, November 18, 2013

Giving Thanks Challenge

This week at Exploring Cricut we're 'Counting our Blessings'.  The challenge is to create projects that celebrate Thanksgiving.  In the season of "Counting Blessings" and giving thanks, I wanted to take the opportunity to make some special cards for some special helpers I have.  My husband and I teach 22 kids (3 & 4 year olds) at our church every week, and we have AMAZING adult helpers that show up every week to help.  This Thanksgiving, I want them to know how much I appreciate them for their dedication week after week, so I've made a few of these to hand out this week:
The best aspect of this card is, aside from the card base, the entire card is made from scraps - BONUS!!!

Don't forget to thank the special people in your lives this holiday!

THANK YOU for stopping by, and don't forget to post those projects over at Exploring Cricut!  We'd love to see what you've made!

About this card:
Brown Card Base: Papertrey Ink 'Dark Chocolate'
Gold Mat & Leaves - Bazzill cardstock
Leaves - Cut from 'Simply Scarecrow' Cricut Cartridge
Sentiment - Cut from 'Winter Woodland' Cricut Cartridge
3D Foam Dots, Stickles and Gunmetal Pearls

Wednesday, November 6, 2013

Birthday Wishes Wednesday

Happy Wednesday Everyone!

Thanks for stopping by to check out my latest card - I created this Birthday card for my boss, whose birthday is this weekend:

There are so many things to love about this card :)

First of all, I made the whole thing using scraps (BONUS!).  Second of all, I LOVE BIRDS... there are so many cute birds on so many different cartridges, but I still think Cricut needs to come out with an ALL BIRDS cartridge (Not like the 3-Birds ones - too cartoon-y).  Thirdly, it had been a while since I used my Bazzill Bling card stock, and now I remember why I loved it so much - it cuts SO nicely in the Cricut - now I have an excuse to go buy more...  and more... and more... :) I mounted the white mat and the bird on 3D foam dots for some depth (and an extra $0.20 to mail).

Thanks for stopping by, and Happy Early Birthday to my Boss!

If you like what you've been seeing from me, please consider becoming a follower!

Don't forget about the challenge going on over at Exploring Cricut!

About this Card:
White Base & Eyelet Mat - Gina K luxury white card stock
Pattern Paper - My Mind's Eye "Penny Lane"
Solid Card Stock - Bazzill Bling
Ribbon - American Crafts
Bird - Cut from Cricut Cartridge "Give a Hoot" in Bazzill Bling
Sentiment - Stampin' Up "Watercolor Trio" set
Mat - Spellbinders Eyelet Circle
Ink - Memento "Bahama Blue"
Fiskars Eyelet Punch, 3D Foam Dots, Primas, Pearls & Gems

Monday, November 4, 2013

Challenge Monday

Good Morning!

Thanks for stopping by to see my first inspiration project as a Designer for Exploring Cricut!

Our latest challenge is as easy as 1-2-3!  You'll need to incorporate onto a card, layout or any project:
1 Pattern paper
2 Cricut cuts
3 Colors

Need some help getting started?  Here's what I whipped up for this round:
I used (1) sheet music patterned paper, (2) Cricut cuts (small mat from Elegant Edges and the music note from Quarter Note) and (3) colors: Black, white and kraft. I embossed the tan mat under the music note, used stickles on the note, and mounted the whole piece on 3d foam dots for some dimension.  I also distressed the mat to visually separate it from the sheet music.

I can't wait to see what you all create using this round's fun 'recipe' :)

Come play with us over at Exploring Cricut!  Have a great week!

About this card:
Base - Kraft cardstock by Papertrey Ink
Music Sheet Pattern Paper - Recollections
Sentiment - My Pink Stamper
Cricut Cartridges: Elegant Edges & Quarter Note
Embossing Folder: Cuttlebug Allegro
Stickles: Black Diamond
Distress Ink: Old Pape
3D Foam Dots
Black/Kraft Paper - Recollections

Sunday, November 3, 2013

Big Announcement!

Good Morning!

I am very excited to share some news with you!  Starting today, I am a new member of the Design Team for Exploring Cricut! 


This is my first time being on a design team, and I am so excited.  Please visit Exploring Cricut and become a follower - there are projects posted daily, and challenges every other week - we'd love to have you join us!

I'll be posting my first project tomorrow, so please be sure to come back for some inspiration, and consider playing along with us!

Have a great day!

Monday, October 21, 2013

Gearing Up For Fall Crafting!

Hi Everyone...

Again, I've gone a couple of months without sharing with you!  I guess a newborn in the house will interfere once in a while :)  I love Fall (although I'm sad to see Summer go) - Fall really gets me in the mood to craft!  Fall color are my favorite, and I'm already thinking about all of the great things I'm going to make for the Holidays.  I have a few gifts to make and want to cut out some vinyl sayings for our walls.  What are your big projects for Fall?

Before I sign off, let me share some things I made this summer:

Birthday Card using up some scraps


A mini-album I made out of a 12x12 sheet of paper.  I found the idea on Pinterest here.
Sorry these pictures are sideways... I CAN NOT figure out how to rotate them >:(
A simple sympathy card using embossing & pearl pens

Finally, a gift for a really cool 6-year old who loves his monsters!
(Cuts from Cricut's Mini Monsters cartridge, Font from Birthday Bash)

Enjoy the changing of the seasons, everyone!


Saturday, June 22, 2013

Boater's Birthday

Good Morning!
Two posts in one week???  This is crazy!  I forgot how much fun blogging was, so my renewed energy has produced today's post.  Today I'm going to see my brother to celebrate his birthday.  He is an avid boater, so I knew I wanted to incorporate that into his card somehow... Here's what I came up with:
I just love how it came out!  I used the "Fun In The Sun" cartridge by Cricut for the boat/guy (in my brother's boat's colors, of course), and I used the Disney "Dreams Come True" cartridge for the 'splat'. I added Glossy Accents to the water under the boat and to the water drops to make it look wet - this card was just screaming for that accent!  Thanks for looking, and have a great weekend!

About this card:
Card Base: Kraft Cardstock by PTI
3 Mat Colors - Recollections
Die Cuts - "Fun In The Sun" Boat; "Dreams Come True" Puddle
D'Vine Swirls Embossing Folder
Sentiment - Studio G stamped in Staz-On Timber Brown
Glossy Accents, 3D Dots

Monday, June 17, 2013

Cook Out Card

Hi!

Sorry to have been a stranger lately - My husband and I just had a baby boy at the end of March, and he has been keeping be busy NOT making cards lately :)  Every now and then, however, he does nap and I am able to sit down and create :)  On an even rarer occasion I take a picture and find time to blog... So here it my latest:


Friends of ours had us over for a cook out last week, so this is the thank you card I sent them. I created the "tablecloth" background by gluing 1" squares in a staggered pattern.  The 2 cuts are from Cricut' Block Party cartridge, and I know it's hard to see, but I used pop dots on those to give the card dimension.  I added the little ant because he made me giggle - I used my black pearl pen to make him.  It feels so good to be playing with paper again! :)

I submitted this card for the following challenge:

About this card:
Card Base: Stampers Select White from PTI
Other papers: Bazzill (Hot Dog & Bun) and Recollections
Stickles: Red
Sentiment: Pink by Design
Die Cuts: Cricut Cartridge "Block Party" Cut at 2"
Ant: Viva Decor Pearl Pen - Black
3D Dots, Memento Tuxedo Black Ink

Wednesday, January 30, 2013

Anna Griffin Cuttlebug - New Folders

Hello Everyone!

I decided to take the plunge last week and ordered the new Anna Griffin Cuttlebug off of HSN.  I primarily did it for the folders (like everyone else, right?), but the machine is so pretty too!  I already have a green Cuttlebug that works just fine for now, so I'll be putting the pretty new one on the shelf as a backup for the inevitable day when mine breaks.

I saw a lot of comments on message boards asking for pictures of the folders that came in the bundle.  I decided to take pictures of the folders that were included, and have inserted them here for everyone to see.  It may help you decide if you HAVE to have one too :)  I hear they'll be offered again in April, and they may be offering just the folders at some time as well.

I apologize up front, the red border folders didn't photograph well - I couldn't find a way to get them to come out better - sorry!

Enjoy...

These are the Anna Griffin A2 Size folders + Borders:

Matelasse

Brocade

Aviary 

Foulard

These are the Anna Griffin 5x7 Folders + Borders:

Poppy

Pirouette

Acanthus

Rosa

These are not Anna Griffin, but were included in the bundle:

Cross My Heart 5x7

Simple Flowers 5x7

Fabric Swatches set - 5x7

I have no idea why this photo uploaded sideways - For the life of me, I couldn't get it to rotate...

Fabric Swatches Set A2

Which one is your favorite? I'm thinking Poppy & Aviary!!!