Background

Showing posts with label Alterations. Show all posts

Wednesday, May 21, 2014

Mid-Week Monogram

Good Morning!  Today I'm sharing an embellished Post-It holder that I made for my Secret Sister at church (her name is Beverly... shhh, don't tell her...)
I had ordered these 4"x4" plain white coasters off of Amazon months ago, and am just now figuring out what to do with them :)  I covered this one with some cardstock from the DCWV Mango Frost stack, I distressed the edges with Victorian Velvet Distress Ink by Tim Holtz, and added the 'B' cut from the Winter Woodland Cricut cartridge.  I evened out the corner with my 1/2" Corner Chomper.  Finally, I covered the clip in Washi Tape and tied small pieces of toule  around the clip to make it fun.
I have 40 of these coasters... Looks like everyone I know is getting a Post-It holder from me for the next couple of months!  I hope Beverly doesn't figure out who I am before it's time!

Have a great Memorial Day Weekend - God Bless America!

Monday, February 24, 2014

Bag, Box or Tag Challenge!

Hey there!  This week over at Exploring Cricut, we are having a challenge - Bag, Box or Tag - Create one, and use a ribbon!  Well, ever since I made that Valentine's Bag a couple of weeks ago, I am on a bag kick, so here's one I altered for this challenge:
I took a store bought blue bag and altered it into a "Winter Wonderland" bag.  Where I live, all you see in snow for miles and miles.  It'll be May before this is all melted!

Here's my bag with the matching tag I made:
And here is the back of the bag:
As you can see, my ribbon/lace is around the top of both sides.  I used the 'Snow Day' and the 'Winter Frolic' Cricut cartridges for this bag.

Now, let's see what you can create for this challenge!  Show us your best Box, Bag or Tag, add a ribbon, and enter in into our challenge over at Exploring Cricut!

Thanks for looking!

Monday, February 10, 2014

Valentine's Day Blog Hop & Challenge!

Hello Hoppers, and Happy Monday!

Today at Exploring Cricut we have new challenge for you, and a BLOG HOP!  Our full lineup for the day is at the bottom of this post.

If you've been hopping with us already, then you're here from Jen's blog - Wasn't her project so inspiring? Our challenge this round is to create a card, layout or papercraft for Valentine's Day, and include at least one jewel.  I was in a swap recently where I had to decorate a gift bag.  The lady I made mine for wanted a bag that captured her love of chocolate for Valentine's Day.  Here's what I sent to her:

 Front

Back

I used Cricut cartridges Sweet Shop, Sweet Treats and From My Kitchen for all of the chocolate goodies.  I embellished each cut to make every 'bite' extra special... here are a few close ups:


I used glossy accents on most of the chocolate to give is a 'syrup-y' look and used lots of stickles for some pop.  My gem is on the slice of cake - did you catch them?  4 little pearls on the icing :)

I also added a tag to match the bag:


Speaking of candy...
Who wants some?
Blog Candy that is!


I am offering this 6x6 "Be Mine" paper pad from Echo Park to one lucky person!  All you have to do is 1.) Become a follower of my blog (if you're not already), and 2.) Tell me in a comment what your favorite candy is.  Please also leave your email address so I can contact you if you're the winner. I will use random.org to pick a winning comment on Sunday Night (2/16).  Personally, I can't imagine life without Junior Mints!!!

Don't forget to head on over to Exploring Cricut and submit your Valentine's Day paper craft - We'd love to see how you inspire us!

Ok, on with the hop.  Following is our full lineup - if you're joining mid-hop, please go back and visit all of the other blogs for inspiration today.  Next up is Michelle S. - Just wait and see how she inspires you today!

Happy Valentine's Day to all!


Donna  http://wwwkindredkreations.blogspot.com

Faith   http://scrapbookerphd.blogspot.com

Rae Ann   http://joyinart.blogspot.com

Emily  http://emilyqueenofallthingscrafty.blogspot.com

Annette  http://mymindsdustbunnies.blogspot.com

Michelle N  http://justanutterpapercrafter.blogspot.com

Jen   www.javajencreations.blogspot.com

You are here ----> Julie      http://mylittlecorner-julie518.blogspot.com <--- You are here

Michelle S  http://cricutcrazyscrapper.blogspot.com

Liz  http://unikbyyes.blogspot.com

Rosa  http://enjoyingthebug.blogspot.com

Diane  http://happyscrapperdiane.blogspot.com


Monday, January 27, 2014

Monday "Recipe" Challenge

Good Morning!

This week over at Exploring Cricut we are hosting what I like to call a "recipe challenge" - you're given the 'ingredients' to use, and you put it together :)  Our recipe for this challenge is "Cricut Choice - Blue, 2 Cuts and Pattern Paper."  Here is what my mind 'cooked up' for that recipe:
I wanted to do something other than a card this go-around, so I made a little paper purse for my daughter.  She has so many little pieces to her dolls, My Little Ponies, Littlest Pet Shops, etc. - I told her she could have this if she kept all the little things in it, and she agreed :)  My blue is my bird, my 2 cuts are the purse (from the Forever Young cricut cartridge) and the bird (from the Cherry Limeaide cricut cartridge), and obviously my pattern paper is the whole project :)

So get your mind cooking, and come join our challenge over at Exploring Cricut - We'd love to see how you've been inspired!

 About this card:
Pattern Paper - DCWV Ultimate Stack
Cricut Cuts - Purse (Forever Young) and Bird (Cherry Limeaide)
Rhinestone Flourishes, Pearls, Rhinestones, Stickles

Sunday, July 15, 2012

Altered Paint Can

I was in a swap where we had to decorate a mini paint can, and stuff it full of goodies and send it to a partner.  My partner gave me a few hints about her style and preferences, and the one thing she said that stood out to me was when she said she liked, "Black and white with a splash of color".  Here's what I made for her:
I used My Mind's Eye paper from their Lush line, and used adhesive pink pearls to accent the floral print.  The black ribbon is seam binding - I have really enjoyed using seam binding on projects - I'm glad someone introduced it to me  not too long ago.  Pretty simple and elegant - I hope she loves it!

Tuesday, June 26, 2012

Alive and Crafting!

My goodness - it's been over 3 months since I've posted!  Life just took me for quite a ride, but I'm back now and I hope to keep up with this blog a little better for the rest of the summer :)  The last 3 months have been filled with birthdays, anniversaries, vacations, work reorganizations, etc.  FORTUNATELY I was able to continue to make lots of goodies, UNFORTUNATELY I was unable to post most of them.  Here are some of the things that kept me busy:

1.) My daughter turned 3 in April, and we had 30+ kids (gulp) come to her party!  As favors, I made each of the kids a personalized water bottle:
I found these bottles at Michael's for $1 each!  I cut each of their names out in white vinyl using my Cricut, and added different colored spots to each to make each one unique.  They were a big hit, especially with the kids who have 'unique' spellings of their names!  This started my newly-found vinyl obsession!

2.) My niece Danielle turned 5 in April, and she loves the Littlest Pet Shop figurines.  I wanted to make her something to hang in her room:
I had to get really creative to make that little cat - I used the Create a Critter cartridge fror most of it, then substituted ovals for the eyes and used stickles to 'draw' in the eye features... Add a peachy Keen face and you have a Littlest Pet Shop!


She loved it :)

3.) My husband and I were watching the movie "Courageous" one night (Must See for ALL parents), and the little girl in the movie had a sign on her wall that said this:
My husband made the comment that he'd like to have that saying hung in our daughter's room, so I made a mental note and created the above.  I took an unfinished wood plaque from ACMoore, painted it, ModPodged it, and added the vinyl letters/designs to in, and finished it off with a little bling.  It matches the colors of our daughter's room perfectly - both daddy and daughter loved it.

4.) My final highlight of the past 3 months was this banner:
I never made a banner before, but I was in a swap where I needed to make something homemade, and the first item on my partner's list was a 'create' banner in lime green/black.  I love how it turned out!  I used my Ribbons & Rosettes cartridge for the first time, and while those little rosettes are a challenge to fold, they looked awesome!
I hope my partner is loving her new banner!

Ok - I have a couple of t-shirt ideas in my head, along with some more vinyl ideas, so hopefully you'll be seeing some of those from me soon.

In the meantime, I hope everyone in enjoying their summer!

Monday, March 5, 2012

Non-Card Fun

Hi Everyone... I just can't seem to catch up and do things I want to these days... such is life :)

I made the following for a friend who I am swapping with on another site:
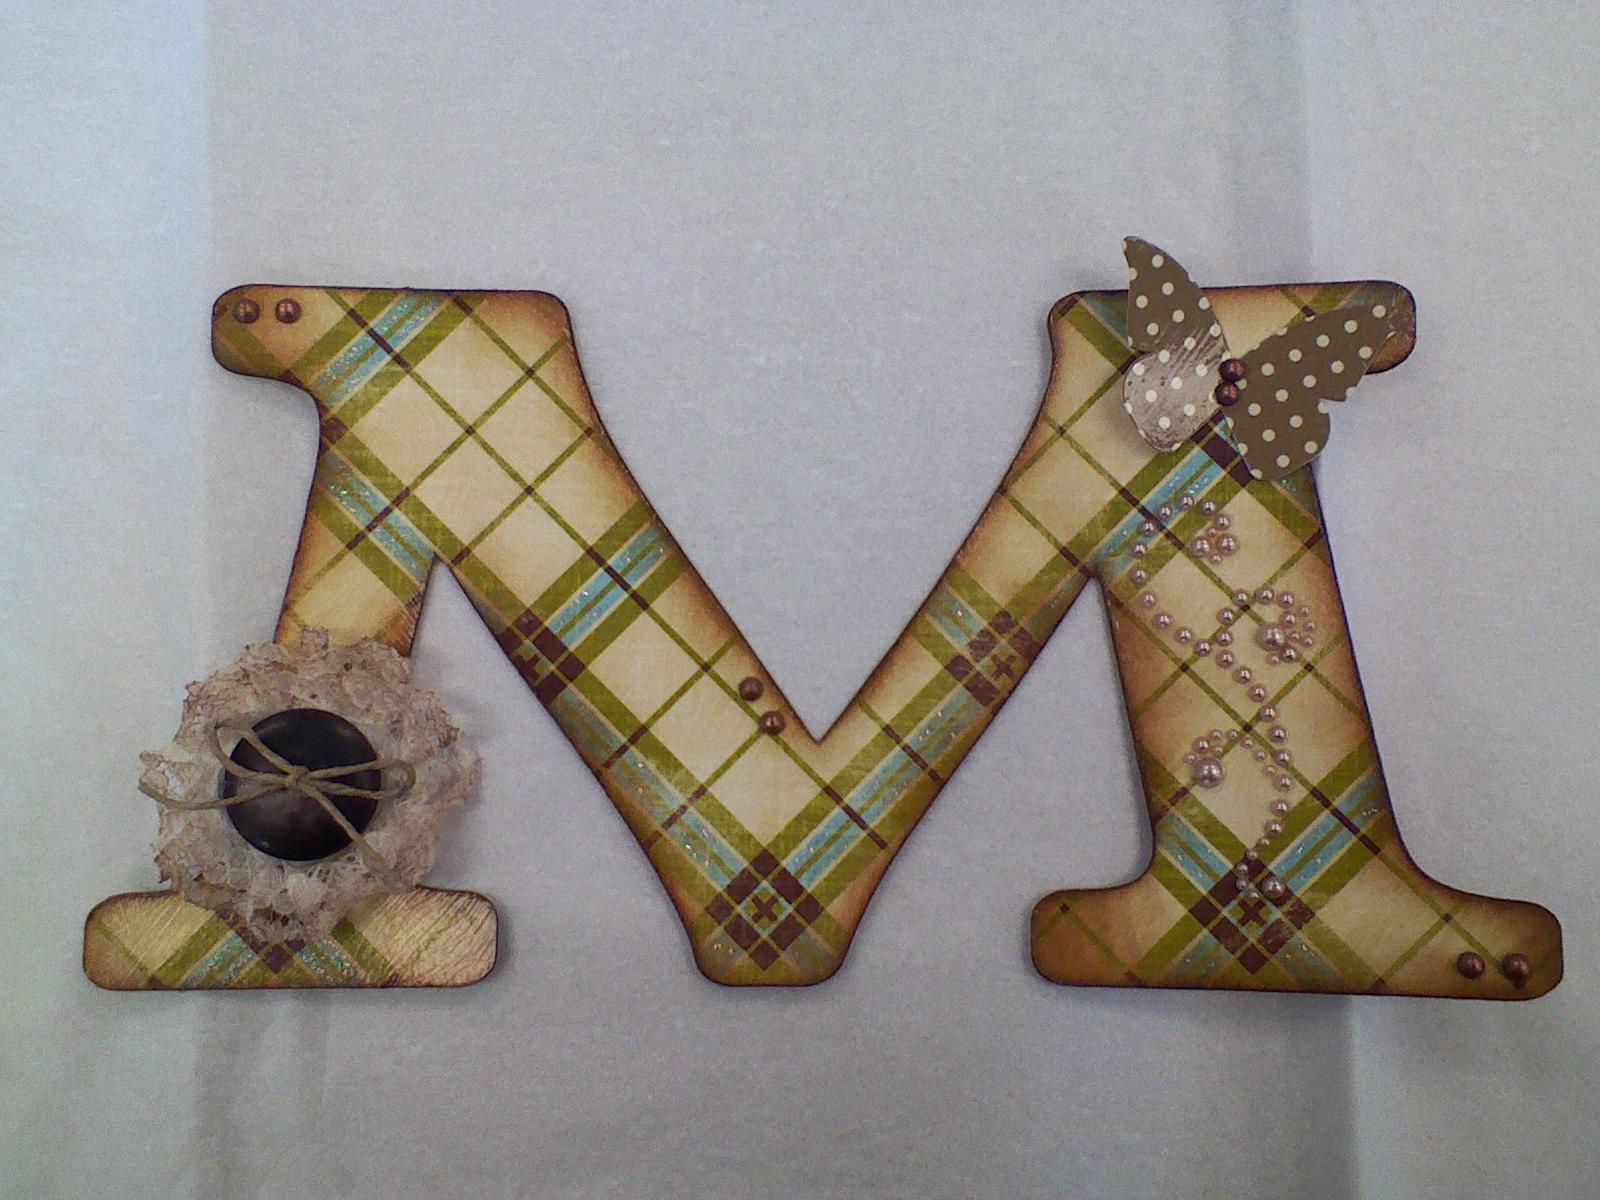
This was my first attempt at altering something totally from scratch.  I started with a cereal box, and used that as my base.  I cut the M from the cereal box, using the Rolly Polly font on the Plantin Schoolbook cartridge.  Then I cut the same M out of some Fancy Pants cardstock I got in a grab bag, and glued them together.  (Lesson learned - - - Next time I will flip one of the images on my gypsy, so I can cover the printed side on the cereal box.  This M says Cheerios on the back of it!)

I distressed the edges with Vintage Photo Distress Ink, and put 2 coats of ModPodge on it.  I used the matte ModPodge for the base coat, then used the glossy ModPodge on top of that - I like the effect it gave the finish.  I also ModPodged the butterfly and used a recollections pearl flourish to embellish the right side.  The left side button was fun to make!  I took some lace and hot-glued folds into it.  then I formed a circle out of it (think rosette folding), and hot glued it onto the back of the brown button.  I distressed the lace with Vintage Photo Distress ink, and tied some hemp cord in a bow through the button holes.  I had to use my ATG gun/tape to get it to stick to the 'glossy' surface - it's not budging, I guarantee it!  I placed a couple of vintage pearls around a few of the edges, and there you have it!

I hope my partner likes it!  The finished size is 6"tall by 10" wide.  I can't wait to make more of these, especially for some kids I know, to help decorate their bedrooms.

Try something new today - I did, and I loved it - Have a great, crafty day!