Background

Showing posts with label Crop Chocolate. Show all posts

Wednesday, April 23, 2014

Spring is Here!


Good morning!  Is it safe to say that the nasty winter is behind us yet?  One thing that I look forward to once the weather starts to warm up is the FRESH PRODUCE that pops up around here.  I live in 'Amish Country', so farm stands are common and the fruit and veggies sold at them are divine!  Ok, ok... make a card already... :)
We will go pick our own blueberries probably sometime in June, but in the meantime I'll have to dream about them by cutting some out of paper :)  I used Cricut's Preserves cartridge for the blueberry cut, and the patterned paper is by Fancy Pants.

Hope you are all enjoying your Spring!

Sunday, July 15, 2012

Altered Paint Can

I was in a swap where we had to decorate a mini paint can, and stuff it full of goodies and send it to a partner.  My partner gave me a few hints about her style and preferences, and the one thing she said that stood out to me was when she said she liked, "Black and white with a splash of color".  Here's what I made for her:
I used My Mind's Eye paper from their Lush line, and used adhesive pink pearls to accent the floral print.  The black ribbon is seam binding - I have really enjoyed using seam binding on projects - I'm glad someone introduced it to me  not too long ago.  Pretty simple and elegant - I hope she loves it!

Monday, March 5, 2012

Non-Card Fun

Hi Everyone... I just can't seem to catch up and do things I want to these days... such is life :)

I made the following for a friend who I am swapping with on another site:
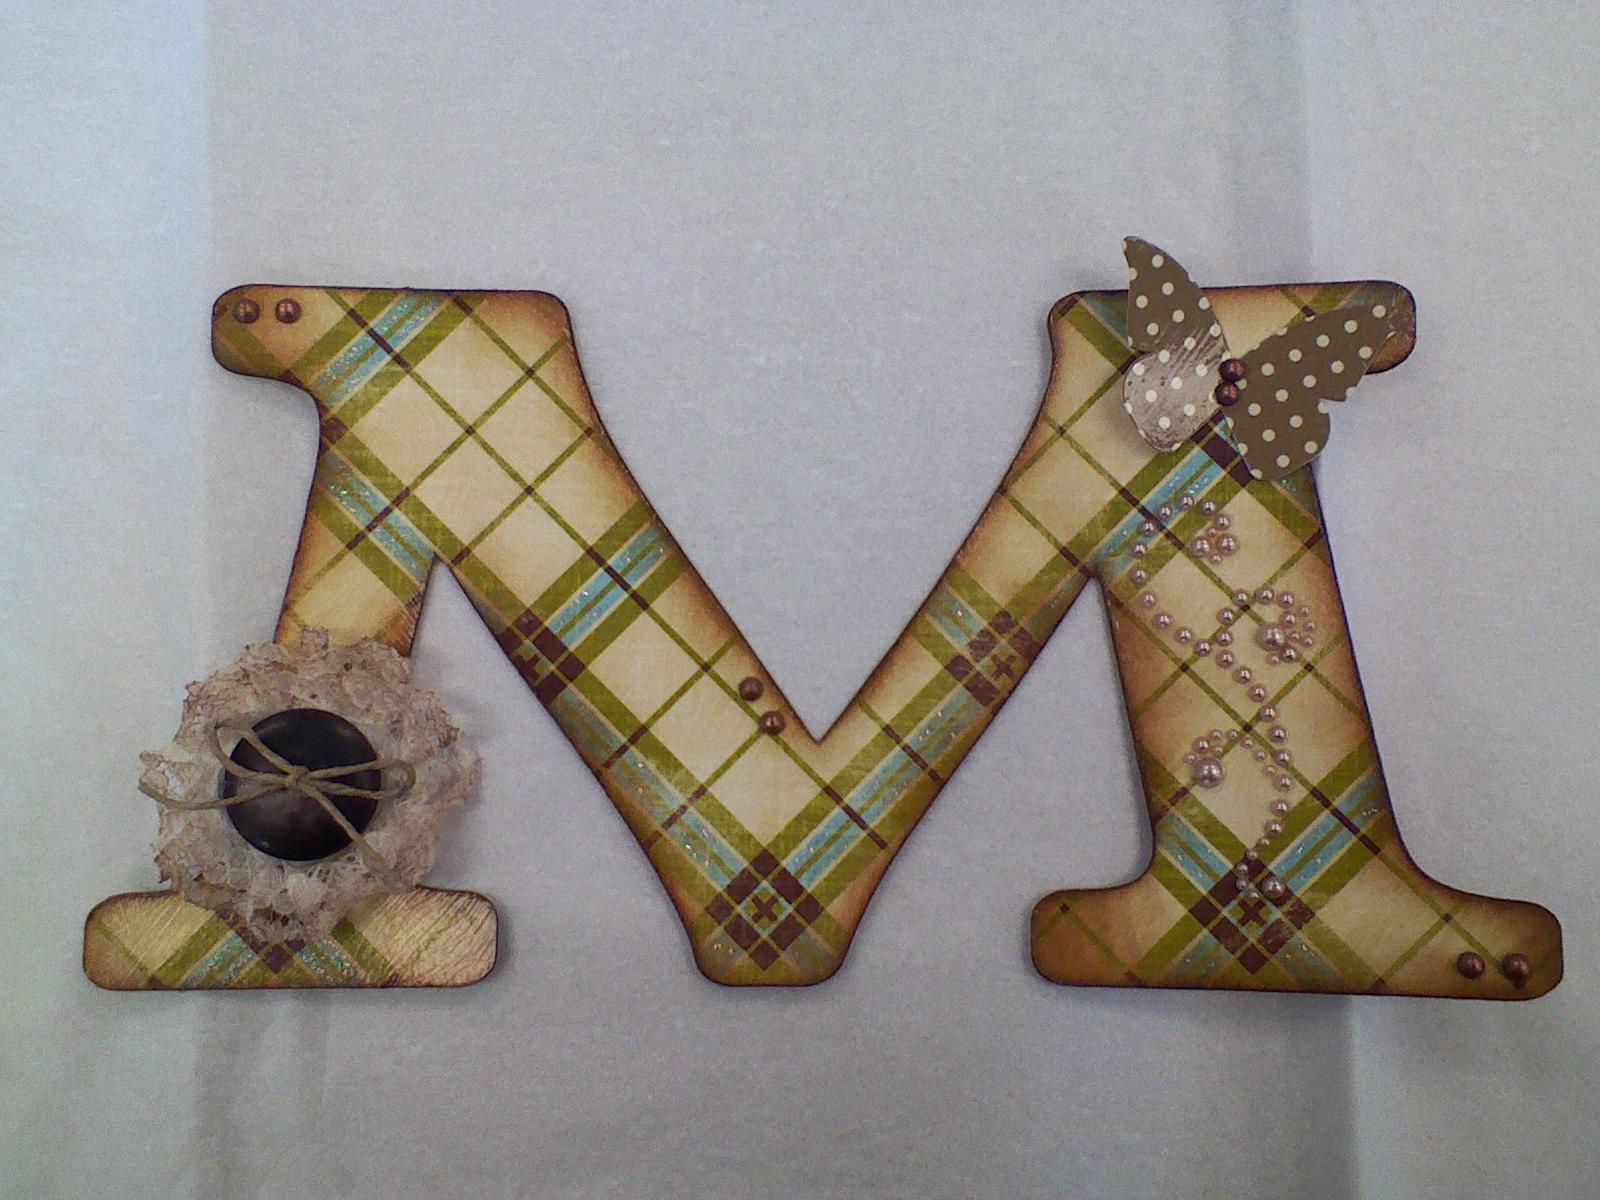
This was my first attempt at altering something totally from scratch.  I started with a cereal box, and used that as my base.  I cut the M from the cereal box, using the Rolly Polly font on the Plantin Schoolbook cartridge.  Then I cut the same M out of some Fancy Pants cardstock I got in a grab bag, and glued them together.  (Lesson learned - - - Next time I will flip one of the images on my gypsy, so I can cover the printed side on the cereal box.  This M says Cheerios on the back of it!)

I distressed the edges with Vintage Photo Distress Ink, and put 2 coats of ModPodge on it.  I used the matte ModPodge for the base coat, then used the glossy ModPodge on top of that - I like the effect it gave the finish.  I also ModPodged the butterfly and used a recollections pearl flourish to embellish the right side.  The left side button was fun to make!  I took some lace and hot-glued folds into it.  then I formed a circle out of it (think rosette folding), and hot glued it onto the back of the brown button.  I distressed the lace with Vintage Photo Distress ink, and tied some hemp cord in a bow through the button holes.  I had to use my ATG gun/tape to get it to stick to the 'glossy' surface - it's not budging, I guarantee it!  I placed a couple of vintage pearls around a few of the edges, and there you have it!

I hope my partner likes it!  The finished size is 6"tall by 10" wide.  I can't wait to make more of these, especially for some kids I know, to help decorate their bedrooms.

Try something new today - I did, and I loved it - Have a great, crafty day!

Tuesday, February 14, 2012

Back to School

Hello!  Wow - 2 weeks without a post... I'm really slipping!  To prove I haven't really been slacking, I have 2 projects to show you that I'm excited about.

First, another card.  It looks very similar to my 'monochromatic' card from a couple of weeks ago:
I am having so much fun with the LUSH line of paper from My Mind's Eye!  My babysitter is getting married this coming weekend, and her wedding colors are black and white with a hint of red.  The card is 5"x5", and the 'doors' are each 3" so they overlap a little bit creating a more dramatic opening.

I am entering this card in Die Cuttin Divas "Pick at Least 2 Colors" Challenge this week!
ETA: My card did not win this challenge, but I was one of 3 cards chosen for their showcase - How exciting!!! See the showcase here: Die Cuttin Divas

The Skinny on this card:
All Cardstock - LUSH by My Mind's Eye
Black CS - Papertrey Ink Pure Black
Sentiment Stamp - Fiskars stamped in Memento Tuxedo Black
Pearl Trim - Joann's (bought by the yard)
Red Pearls - Stash

My next project is my first submission for an online COPICS class that I am taking.  It just started today, and our first assignment was to color 'something' for the instructors to see, so that they can offer insight and get a sense of what skills we are needing to work on.  Here's my initial submission:
Angel Anya

I was excited about how her hair turned out, but I need help on that dress and the wings.  The instructors said that we will be coloring these same images at the end of the class again, so we can see how much we have improved.  I'm hoping to share my journey with you here - if I don't have too much homework, I'll be sure to post often!  It's a 3 week class with 18+ lessons, so I plan on being pretty busy!

Sorry no pink project to share, but I do hope everyone has a WONDERFUL Valentine's Day!

Thursday, January 19, 2012

Playing with LUSH

Good Evening...

I have a Cricut-less card to share with you tonight!  I bought some gorgeous My Mind's Eye papers from CropChocolate.com, and was inspired by one of the ladies on that website (Credit-StampinHampton) to create this card:
Which opens up to look like this:
I really like the look of mono-chromatic cards, and this line of paper is perfect for making them. I love birds, so I really wanted to make the bird (from the Finch cardstock) the centerpiece of this card - I love how it turned out!

I didn't have anyone special in mind when I made it, so I left the sentiment pretty generic.  I have this paper in about 8 different colors, so don't be surprised if you see more 'mono-chromaticism' from me :)  Sorry, it's late and now I'm making up words... Thanks for looking!

About this card:
Card Base - My Mind's Eye Lush Green Diamonds (11"x5" folded to 5"x5")
Solid Cardstock - Papertrey Ink Ripe Avacado
Patterned Cardstock - My Mind's Eye Lush Green Finch and Lush Large Green Polka Dot
Sentiment - Fiskars All Year Greetings
Ink - Ranger Distress Ink Forest Moss

Thursday, October 13, 2011

Stitching Challenge

Wow... It's been a while since I've posted!  It's been tough to craft lately - we are in the process of trying to see our house, and my realtor told me that I had to pack all of my crafting stuff away to make the room look less cluttered.  It is a lot of work pulling it all out and setting things back up again, so I've been taking a bit of a break.  That said, I was assigned a challenge to make something with stitching on it.  The stitching doesn't have to be real, which is the only reason I was able to participate:)  Here's what I came up with:


It's a simple 4x4 card, and it helped me get my stuff all set up again, so hopefully more good stuff will be coming soon!

About This Card:
Papertrey Ink Brown Cardstock Base
Patterned Paper - MME Laundry Line
Solid Cardstock - Papertrey Ink Ocean Tides
Ribbon & Pearls - Stash
Butterfly - Making Memories Paper Reverie
Sentiment - My Pink Stamper Summer Vacation
Stickles - Cinnamon 

Friday, August 19, 2011

Challenge Time!

Hi Everyone!  I have some good news :)  I was accepted into the Focus Group for Crop Chocolate, the one I told you about in my previous post!  I am very excited to be a part of this group!  We were already given a challenge to participate in, so I wanted to share my entry with you, and wanted to show you how YOU can play too!  We were given this photo:
We were asked to design a project using this photo collage for inspiration, that contained 75% of materials purchased from Crop Chocolate (see sidebar).  Here's what I came up with:

As you can see, I focused on layout and basic elements for this card I entered.  Here's what I used:

All of the cardstock came from a Crop Chocolate (CC) grab bag (with the exception of the white base & the white tag I stamped/colored).  Here's what I used:

1.) Upper left corner - Bo Bunny a gift of Love/Coral Dot mounted on Basic Grey Indian Summer plum wine.  I used Gina K luxury white for the tag/stamp base - the stamps (inkadinkado & KI & Co.) and copics I used to color were mine. I cut the tag from Spellbinders Labels 4.

2.) Upper right corner - American Crafts City Park/Hyde Park mounted on Echo Park Be Mine/Lipgloss Stone. I ran the top layer through my cuttlebug using my swiss dots folder.  I mounted on them a Sassafras Paper Whimsy/Flower Child and put glossy accents on all of the petals & stem.  The button in the center is a Making Memories paperie button from the poolside collection. - All CC :)

3.) Lower left corner American Crafts City Park/Lakeside park mounted on the reverse side of itself.  The twine was from my stash, and the brad is from Making Memories Paper Reverie Noir collection.

4.) Lower right corner - American Crafts City Park Fairmont Gardens mounted on the reverse side of itself.  I ran the top layer through my cuttlebug using the d'vine swirls folder, then mounted Making Memories Metal Butterflies to it. - All CC again :)

NOW - Here's how you can play along... My friend Paula at Scrap Addict's Attic is using the same photo collage as inspiration for a challenge on her blog - please click through to her blog and play along... you'll be amazed what you come up with!

Have a great weekend everyone!

Wednesday, August 3, 2011

Focus Group Entry

Hello everyone!  This week I decided to enter to become a member of a focus group for Crop Chocolate (CC).  CC is a website that offers 1 deal at a time, multiple times throughout the day.  What makes them extra special, is that you can hold numerous items in your cart and have them shipped all together to save on shipping.  I stumbled upon them 2 months ago, and it has become my favorite site for deals - click the link in my sidebar to check them out - tell them 'Crazy4Cocoa' sent you (yep... that's me)!

Back to the topic here - CC is forming a focus group and asked people to enter by creating a project using 4 elements from crop chocolate.  Here's my entry:

The 4 elements I used from CC were the patterned paper (Echo Park Splash), the whale's eye is a Basic Grey brad from Oliver, the aqua trim is from the Fine and Dandy line and the Blue button is from Making Memories.  I'll let you know if I make the cut!  If I don't, there will be a new focus group forming in 6 months, so there's always next time :)

Additionally about this card:
Navy Cardstock Base - Papertrey Ink Enchanted Evening
Whale - Cricut Cut from Splish Splash Lite Cartridge cut at 3" using Bazzill Bling Cardstock
Sentiment - My Pink Stamper Punny-licious Set
Stickles - Turquoise & Waterfall
Twine & White CS - Stash

Thanks for looking!

Saturday, July 23, 2011

Pool Party!

As I mentioned in my last post, my Mom watched my daughter, my niece and my nephew one day last week. Being the WONDERFUL Grandma that she is, she threw a little pool party (for a 4-yr. old & 2 2-yr. olds) complete with baby pool, sprinkler and popsicles!  I made this card to send to her to thank her for her wonderful hospitality last week:


I recently cleaned and organized my craft room, and it has made it so much easier to throw together these little cards.  Now, can I keep it that way...?

About this card:
Card Base - Papertrey Ink Cardstock in Hawaiian Shores (5x5)
Patterned Paper - Echo Park's Splash Collection
Spellbinders - Labels One
Cricut Cut from Pack Your Bags at 2.5"
Sentiment - Pink by Design Summer Vacation
Ribbon - American Crafts
Stickles - Orange, Lime Green, Black Diamond, Magenta, Pink & Turquoise
Stash - White Cardstock, Bling & Googlie Eyes

Tuesday, July 19, 2011

Playing With Some of My New Things

I hope everyone is having a great week!  In the not too distant past, I've received various summer-themed elements, and I've been so anxious to put some of them together into cards.  Here's one that I came up with tonight using a new cartridge, new paper and a new stamp set:

 So sorry my pictures aren't good... Maybe I'll get a nice digital for Christmas - I just use my cell phone right now.  Anyway... I scraplifted the layered background idea from a friend (If you recognize it, Thanks!) I like that I can use this card for a pick-me-up or a birthday... but for now, into my stash it goes!  Have a sunshiney day everyone!

About this card:
5x5 Card Base - Kraft Cardstock (stash)
Patterned Paper - My Mind's Eye "Fine & Dandy"
Sun - Cricut Cut from "Pack Your Bags" cut at 3" using Bazzill Bling cardstock
Sentiment - Pink By Design stamp set "Summer Vacation" on Bazzill Bling
Spellbinders - Label 4
Stickles - Yellow & Orange Peel
Stash Bling

Thanks for looking!

Sunday, July 3, 2011

Replenishing My Stash

Hi Everyone - Happy 4th of July weekend!  Isn't it great that the 4th fell on a Monday this year?  I just LOVE 3-day weekends!  My "extra cards on hand" stash got hit pretty hard last month, so I am in the process of replenishing.  I've been VERY anxious to try out my new Florals Embellished Cricut cartridge, and I LOVE it!  I really enjoy making 4x4 cards - they're small enough to make quickly, they're big enough to get the "wow" factor, and you can make an envelope for them out of a regular sized piece of paper.  Here's the one I made last night:
 
The card uses 3 of my favorite papers, which I'll specify below.  The cut is mounted on the card using Pop-Dots, to give it some dimension.  This cut is 7 layers thick, so it may not have needed it, but I wanted it to have that extra pop!  I left the inside blank so that they can be used for whatever occasion comes up at the last minute - all I need to do is stamp a quick sentiment inside, and I'm ready to go:

I love how summery this card looks - guess that means that I need to use it soon!  Happy Independence Day!

About this card:
Base Cardstock - Papertrey Ink (8x4)
Cricut Cut - Florals Embellished using Bazzill Bling cut at 2.5"
Patterned Paper - My Minds Eye "Fine & Dandy" Line
White Cardstock, 3D Dots & Twine - Stash